Phase IIa Liquid Cooler
I replaced the 30mm Peltier with a 40mm one and added an aluminum spacer block to the original Phase
II design. The results were pretty cool!
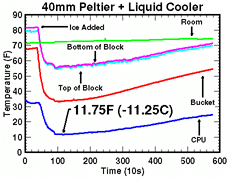
11.75F (11.25C)
NOTE: You can click on the images to get (slightly) bigger versions.
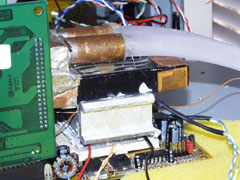
 I had a big problem with the physical size of my liquid cooler. As you can see in this image
there are a lot of componets on the motherboard that stick up around the CPU. I decided to
attach an aluminum block to the hot side of the peltier so I could mount the liquid cooler
without bumping into anything.
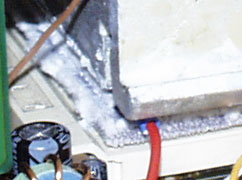
 You can see ice buildup on the CPU in this shot. During Phase II I had a problem where
condensation built up on the CPU pins and then froze. When it froze, the ice crystals on the
CPU pins managed to grow together and short out the CPU. When melted the ice and dried the
CPU and motherboard everything worked OK so I lucked out.
In Phase IIa ice built up on the CPU case and managed to seal the CPU to the socket7. I ran
the CPU in this configuration all day with no problems. When I removed the CPU I found no
condensation at all under the CPU. So it looks like a good seal between the CPU and the socket
will prevent the condensation problem!
 I added two new sensors to the array. I attached one sensor to the top of the aluminum block
and one to the bottom. You can see that the temperature difference between the top and the
bottom is actually quite small. This was a supprise. I figured that the difference would
be fairly large since the block is an inch tall!
The larger pelter didn't really make much of a difference though. Phase II got down to 30F
with 50F water where Phase IIa got down to 12F with 33F water. There are two reasons for the
poor performance of Phase IIa. One is the fact that there are 3 surface contact points which
were probably not making very good contact. A second problem is the 1" thick aluminum block
which wasn't insulated at all. A third problem was the lack of insulation around the CPU.
Go Back
All images and data Copyright 1998 Larkin Lowrey
 I had a big problem with the physical size of my liquid cooler. As you can see in this image
there are a lot of componets on the motherboard that stick up around the CPU. I decided to
attach an aluminum block to the hot side of the peltier so I could mount the liquid cooler
without bumping into anything.
 You can see ice buildup on the CPU in this shot. During Phase II I had a problem where
condensation built up on the CPU pins and then froze. When it froze, the ice crystals on the
CPU pins managed to grow together and short out the CPU. When melted the ice and dried the
CPU and motherboard everything worked OK so I lucked out.
